
TL;DR
Acoustic dampening in a closet is mainly about controlling reflections, not complete soundproofing. Moving your rig away or sealing gaps makes the biggest difference. Proper placement of panels and ventilation is key to a quiet, effective setup.
Ever wonder why a closet can turn into a surprisingly good recording booth? It’s not just about stuffing it with foam. The secret lies in where you place your treatment, how you manage noise leaks, and whether you understand the difference between dampening and soundproofing. Understanding acoustic dampening placement is key to optimizing your setup.
If you’ve tried DIY solutions and still struggle with echo or noise escaping, this guide will give you concrete, real-world tips to make your closet into a quiet, usable space. Whether you’re recording vocals or just want a peaceful workspace, mastering these tricks will change the game.
Acoustic dampening
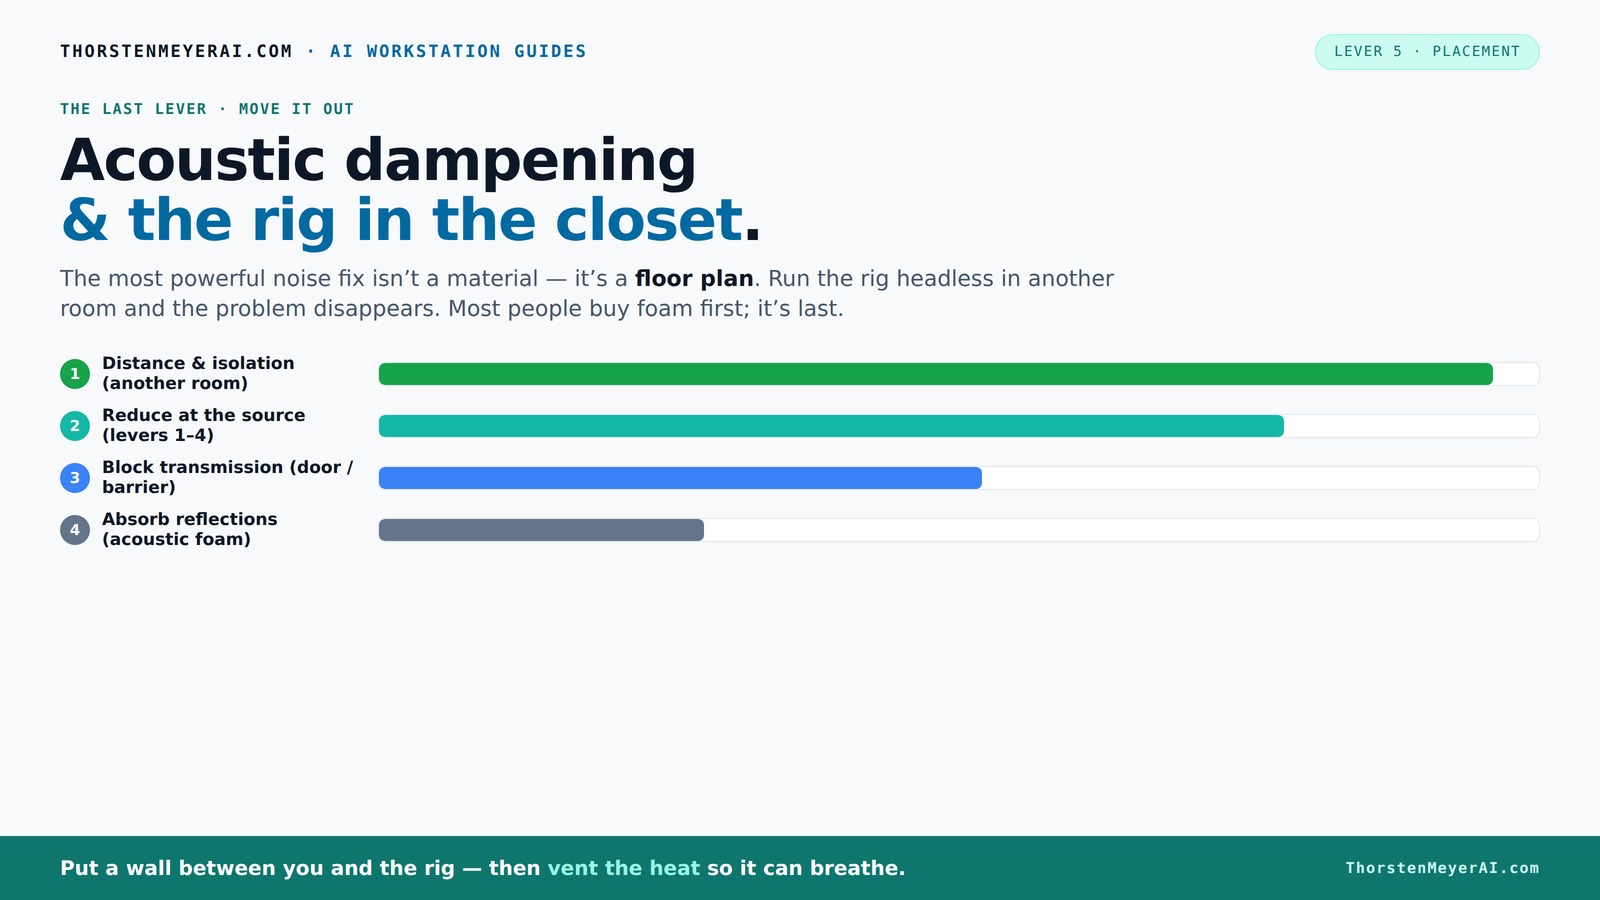
& the rig in the closet.
The most powerful noise fix isn’t a material — it’s a floor plan. A rig you can’t hear because it’s in another room beats any amount of foam. Tap the approaches in Part 1 to see what actually works.
(another room)
(levers 1–4)
(door / barrier)
(acoustic foam)
Contain the noise, not the heat
Key Takeaways
- Moving your rig into another room is the most effective way to reduce noise and heat.
- Acoustic dampening focuses on reducing echo and reflections, not soundproofing; sealing gaps is crucial.
- Placement of panels at reflection points and behind the mic makes a bigger difference than just foam on the walls.
- Ventilation and proper airflow are essential for a closet rig to stay cool and safe.
- Budget solutions like blankets, rugs, and reflection filters can dramatically improve sound without expensive upgrades.

50 Pack Acoustic Foam Panels,2"X 12" X 12"Sound Proof Foam PanelsHigh Density Sound Absorbing Panels,Soundproof Wedges Panels for Studio Recording & Office & Home
- Professional Sound Absorption: Reduces noise and echoes effectively
- Easy Installation: Lightweight panels with simple mounting options
- Eco-Friendly Material: Made from non-toxic, formaldehyde-free foam
As an affiliate, we earn on qualifying purchases.
As an affiliate, we earn on qualifying purchases.
Why Acoustic Dampening Isn’t the Same as Soundproofing
Acoustic dampening reduces echo and room coloration, while soundproofing blocks sound from escaping. In a closet, foam panels soften reflections—making your voice clearer—but don’t stop sound from leaking out through gaps or the door.
Understanding this distinction is crucial because it influences your choices and expectations. For example, investing heavily in foam without sealing gaps might make your recordings sound better internally but won’t prevent your neighbors from hearing noise. The tradeoff is that dampening is generally easier and cheaper but less effective at isolating sound. If your goal is complete silence, both strategies—dampening and sealing—must be combined. Recognizing what each method can and cannot do helps you allocate your budget wisely and avoid frustration from over-investing in measures that don’t solve your core problem.
Where to Place Acoustic Treatment for Maximum Impact
Placement is everything. For a closet rig, treat the primary reflection points first—these are behind the mic, at the side walls, and above your head. Proper placement of acoustic panels can drastically improve your sound quality.
Imagine standing at your mic: the wall behind you, the sides, and the ceiling bounce sound back into the mic. Covering these areas with 2-inch thick panels can drastically reduce boxiness and echo. Corner bass traps help if your low end sounds boomy, but in tight closets, broad wall coverage often does more.
Pro tip: a blanket or foam on the desk surface can cut down on reflections bouncing off the hard surface below your mic.
Why does this matter? Because sound reflections at these points cause muddiness and reduce clarity. Properly treating these areas ensures your recordings are cleaner and more natural. However, overdoing treatment in non-critical areas can be a waste of resources; focus on the most impactful reflection points first for efficient improvement. The tradeoff is that extensive coverage might reduce usable space or airflow, so strike a balance based on your priorities.
The Power of Moving Your Rig Out of Sight and Sound
The simplest way to cut noise? Put the rig in another room. A closet, basement, or spare office—anywhere away from your workspace. This is especially true for AI workstations or gaming PCs that make a racket.
By doing this, the noise and heat no longer bother you. You can SSH into your remote rig while the loud GPU roars in another room, and your workspace stays silent. All it takes is a good network connection and proper ventilation.
Why does this work so well? Because sound and heat are directly linked to proximity. Moving the hardware away reduces the noise reaching your ears and helps prevent overheating issues. The tradeoff is convenience versus performance—remote setups require some extra planning and infrastructure. But for most users, this method offers the most significant reduction in perceived noise and heat, making your workspace much more comfortable and quiet.
The 'Rig in the Closet' Setup— What You Need to Make It Work
Sealing a closet for soundproofing sounds tempting but is tricky. The key is ventilation. A sealed space traps heat, turning your quiet closet into a sauna for your rig. Ventilation strategies for sealed spaces are essential.
To prevent overheating, install passive vents or a quiet exhaust fan. For serious silence and cooling, consider a purpose-built soundproof cabinet with ducted airflow and temperature control. Otherwise, a simple fan and proper spacing will do.
Why does ventilation matter? Because electronic components generate heat that, if not dissipated, can cause hardware failure or reduce lifespan. Proper airflow ensures your equipment stays within safe operating temperatures while maintaining a quiet environment. The tradeoff is balancing sound isolation with adequate cooling—completely sealed environments often need more sophisticated solutions, such as ducted ventilation or active cooling systems, which can be more complex and costly. For most DIY setups, passive vents combined with strategic placement provide a good compromise.
Check out the [heat and noise reduction tips](https://thorstenmeyerai.com/reduce-heat-noise-ai-workstation/) for more detailed strategies.
How to Seal Gaps and Block Noise Leaks in a Closet
Gaps are the biggest weak points. Doors, vents, and cracks let sound escape. Seal these with weatherstripping, acoustic sealant, or heavy blankets. For the door, think mass—adding a door sweep or using a dense blanket can cut noise transmission significantly. Sealing gaps for better soundproofing can greatly improve your results.
Imagine sealing every crack like wrapping your closet in a soundproof blanket. It’s the difference between a noisy closet and a quiet one.
Why is sealing so effective? Because sound leaks often occur through small gaps that are invisible or neglected. These tiny openings can transmit a surprising amount of sound, undermining your entire effort. Proper sealing not only reduces noise escape but also improves internal acoustics by preventing external noise from entering. The tradeoff is that excessive sealing can make access cumbersome, so plan for easy access points when sealing. Learning the right materials and techniques ensures you get maximum benefit without sacrificing usability.
Learn more about sealing techniques in the [soundproofing essentials](https://www.soundproofcow.com/how-to-soundproof-closet/).
Cost-Effective DIY Solutions for a Quiet Closet Studio
You don’t need expensive gear to improve your closet’s acoustics. Thick blankets, rugs, and clothes act as makeshift dampeners. Reflection filters around your mic help reduce unwanted echoes without permanent changes. Home improvement and DIY ideas can help you find affordable solutions.
Place a thick rug on the floor, hang blankets on walls, and add foam panels at reflection points. These simple steps can turn a noisy closet into a decent vocal booth.
Why do these solutions work? Because they absorb and diffuse sound waves, preventing reflections that muddy your recordings. Although they might not block all external noise, they significantly improve internal acoustics at a fraction of the cost of professional treatments. The tradeoff is that these DIY methods might not be as durable or as effective as commercial solutions, but they are quick, affordable, and customizable. For best results, combine multiple approaches—like sealing gaps and treating reflection points—to achieve a balanced, quiet environment.
Check out affordable options on [Amazon](https://www.amazon.com/dp/?tag=dreamridiculo-20) for quick upgrades.
Do You Need Bass Traps or Just Broad Coverage?
In tiny spaces like closets, bass traps are often overkill unless you’re dealing with serious low-end boom. Usually, broad wall coverage with 2-inch panels reduces mid and high frequencies enough to improve clarity.
Think of it this way: low frequencies are harder to control because they require larger, more substantial treatments. In small closets, the low-end issues are often caused by reflections and standing waves that can be addressed with broadband absorption. If your vocals sound boomy or boxy, adding corner bass traps can help, but it’s often more effective to focus on treating reflection points and the ceiling first. Larger rooms benefit more from bass traps because low frequencies have more space to develop, but in tight spaces, the emphasis should be on broad coverage and reflection management. The tradeoff is that installing bass traps can be more costly and complex, so evaluate whether your low-end issues warrant the investment.
Mic Placement and Treatment: The Perfect Combo
Where you place your mic significantly impacts your sound. The best spot is a few inches away from reflective surfaces—ideally, behind a reflection filter—so direct sound hits the mic first.
Position the mic at head height, aimed at the singer or speaker, and treat the reflection points around it. Use a combination of broadband panels and a reflection filter for cleaner recordings.
Why is this effective? Because direct sound captured without interference ensures clarity, while treating reflection points minimizes echo and room coloration. Combining proper mic placement with strategic treatment creates a synergy that results in professional-sounding recordings. The tradeoff is that improper placement can cause phase issues or coloration, so take time to experiment with position and treatment for optimal results.
Frequently Asked Questions
Is acoustic dampening the same as soundproofing?
Not quite. Dampening reduces echoes and room coloration, making the sound clearer. Soundproofing blocks sound from escaping or entering, which requires mass, sealing gaps, and structural decoupling. In a closet, focus on dampening first, then seal weak points for better isolation.What’s the cheapest way to make a closet sound better?
Use thick blankets, rugs, and clothes to absorb reflections. Hang blankets on walls and cover reflective surfaces. Reflection filters around your mic also help. These DIY solutions are affordable and effective for small spaces.Where should I place panels in a closet booth?
Treat the reflection points behind the mic, on side walls, and above your head. Corner bass traps help if low-end is boomy. Covering a large wall area with broadband panels makes a noticeable difference in sound quality.Do foam panels work in a closet?
Yes, they reduce echo and flutter echoes, especially at mid and high frequencies. But they don’t block sound transmission. For best results, combine foam with sealing and placement at reflection points.Should I treat the door or walls first?
Start with the door—seal gaps and add mass. Then treat the walls at reflection points. Proper sealing prevents sound leaks, while panels improve internal acoustics.Conclusion
Remember, the best noise control is distance. If your rig lives in the closet, focus on sealing gaps, placing treatment strategically, and providing proper ventilation. With a bit of planning, you can turn a tiny, echoey closet into a quiet sanctuary for recording or working without disturbance.
Next time you think about soundproofing, ask yourself: can I just move it? Because sometimes, the biggest win is simply putting space between your noise source and your ears.